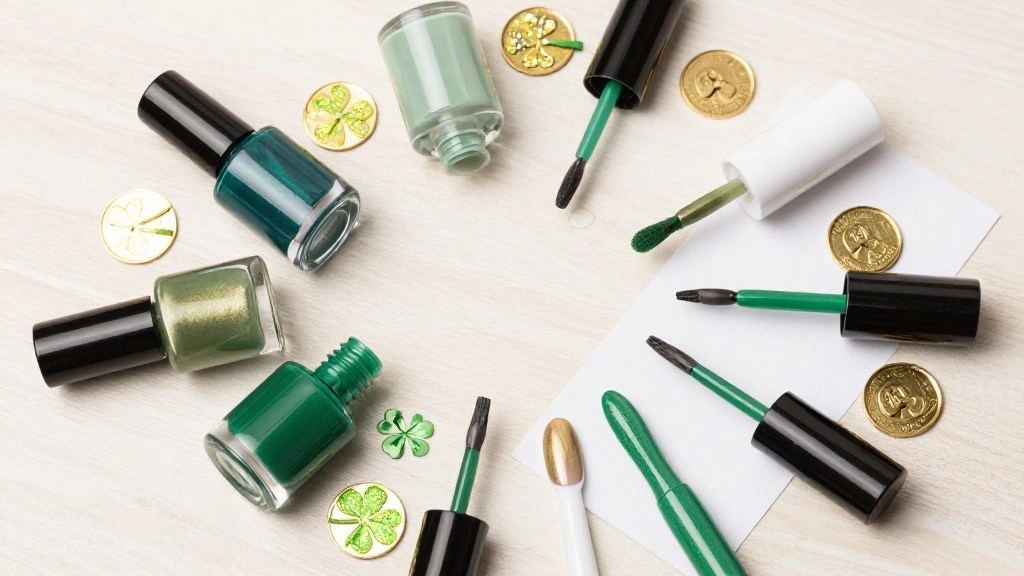
St. Patrick’s Day is that time of year when everyone gets into the spirit of luck, joy, and all things green. If you’re like me, you find yourself craving a fun way to celebrate this festive occasion. What better way to show your enthusiasm than with some creative and eye-catching St Patrick’s Day nail designs? Nail art is a perfect way to express your personality and celebrate seasonal themes, and I’m here to help you nail it (pun intended)!
This post is for anyone who loves beauty, particularly those who enjoy the fun and art of nail design. Whether you’re a nail art novice or a seasoned pro, you’ll find ideas here that cater to every skill level. From cute clovers and glittery gold accents to classic green ombre styles, this list of nail designs will inspire you to embrace the St. Paddy’s Day spirit in a unique way.
You’ll discover 14 must-try nail art ideas that are easy to recreate and sure to impress. Each design offers a blend of charm, creativity, and festive flair, making your nails the talk of any St. Patrick’s Day gathering. So, grab your favorite nail polish, and let’s dive into these fabulous designs that will have you feeling lucky all day long!
Key Takeaways
– Explore 14 diverse St Patrick’s Day nail designs that suit various skill levels, from beginner to expert.
– Discover ideas like the Classic Green Ombre and Cute Clover Nail Art that celebrate the season’s festive spirit.
– Get inspired by designs featuring gold accents and creative patterns that brighten up your look.
– Each design includes practical tips for application and the materials you’ll need to create stunning seasonal nail art.
– Embrace the fun of nail art as a way to express your personality and celebrate St. Patrick’s Day in style.
Contents
- 1. Classic Green Ombre
- 2. Glittery Gold Accent
- 3. Cute Clover Nail Art
- 4. Rainbow and Pot of Gold
- 5. Gold Leaf Details
- 6. St. Paddy’s Day Plaid
- 7. Shamrock Stamping
- 8. Watercolor Swirl
- 9. Simple Gold Dots
- 10. Lucky Charm Nail Art
- 11. Negative Space Nail Art
- 12. Abstract Art with Gold Flakes
- 13. Festive Skittle Nails
- 14. Themed Nail Art with Rhinestones
1. Classic Green Ombre
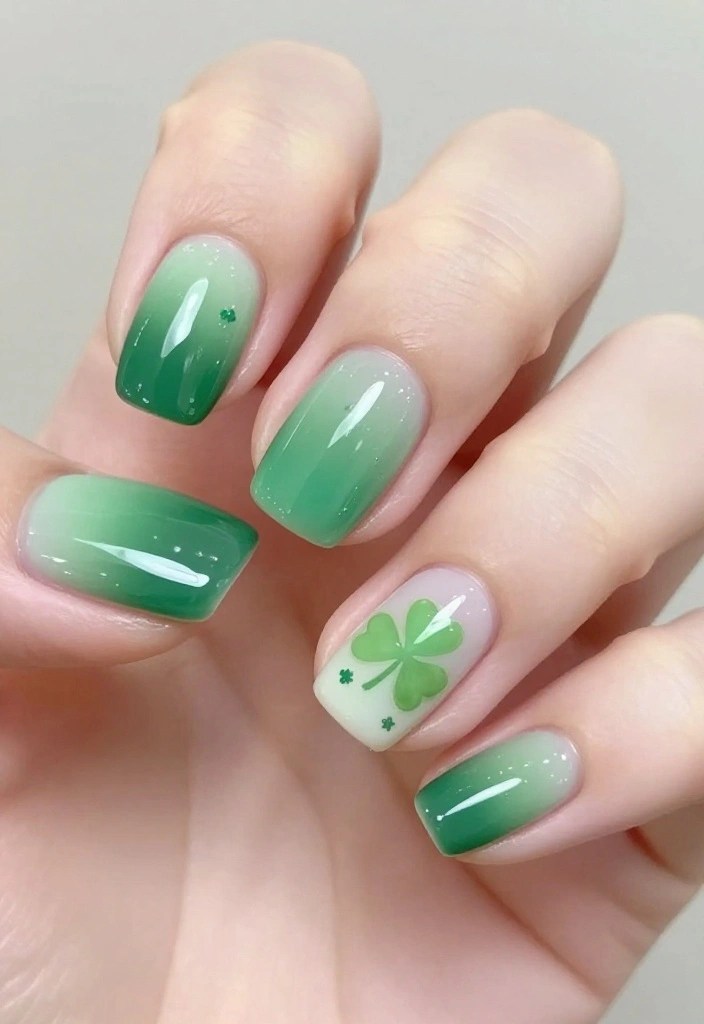
Looking for a stylish way to celebrate St. Patrick’s Day? Try the classic green ombre nail design! This stunning gradient transitions from a rich emerald to a soft, lighter green, echoing the lush beauty of Ireland. It pairs perfectly with any outfit, making it a versatile choice for the holiday.
To create this look, start with a protective base coat. Paint deep green on the tips and blend it into a lighter green toward your cuticles. For added shine, finish with a shimmering top coat that enhances the ombre effect.
Key tips for achieving the ombre:
– Use a makeup sponge for a seamless blend.
– Let each layer dry before applying the next.
– Seal with a glossy top coat for a polished finish.
Ingredients you’ll need:
– Deep emerald green polish
– Light green polish
– Clear top coat
Step-by-step guide:
1. Apply a base coat to clean nails.
2. Paint the tips with dark green polish.
3. Use a sponge to dab lighter green toward the base.
4. Seal with a top coat for extra shine.
This elegant design is perfect for adding a festive touch to your nails!
2. Glittery Gold Accent

Want to add a touch of sparkle to your St. Patrick’s Day look? The glittery gold accent nail design is the perfect festive choice! By combining deep green nails with one or two glittery gold accent nails, you can create a glamorous statement that truly dazzles.
Start with a solid green base coat. Once dry, choose one or two nails to coat in glittery gold polish. Be sure to let the glitter dry completely before sealing with a top coat to avoid smudging the colors. This eye-catching design will certainly turn heads!
Tips for applying glitter:
– Use a clear polish as a base for better adhesion.
– Apply several coats for a more intense glitter look.
– Gently brush off excess glitter with a fan brush.
Ingredients to gather:
– Deep green nail polish
– Gold glitter polish
– Clear top coat
Step-by-step instructions:
1. Apply a base coat to all nails.
2. Once dry, paint nails with deep green polish.
3. Apply gold glitter polish to selected nails.
4. Seal with a glossy top coat.
This design is a fun way to show off your love for bling!
How To Choose the Right St Patrick’s Day Nail Designs
Choosing the perfect St Patrick’s Day nail designs can be exciting yet daunting. With so many creative options available, you want to ensure you select designs that match your style and mood. Here are some tips to help you decide.
1. Consider Your Base Color
Green is the classic choice for St Patrick’s Day, but there are many shades to explore. Think about vibrant greens, soft pastels, or even dark emeralds. You can also add complementary colors like gold or white to create stunning contrasts. Choose a base color that reflects your personality and makes you feel festive.
2. Think About Your Nail Length
The length of your nails can affect which designs will look best. Short nails may benefit from simpler designs, while longer nails can handle intricate artwork like clovers, rainbows, or gold accents. If you have short nails, consider opting for designs with negative space or simpler patterns that won’t overwhelm your look.
3. Look for Seasonal Nail Art Inspiration
Explore seasonal nail art trends for inspiration. Social media platforms like Instagram and Pinterest are treasure troves of ideas. Search for hashtags like #StPatricksDayNails or #NailArt to find designs that catch your eye. Make a list of your favorites and think about how you can personalize them.
4. Evaluate Your Skill Level
Your experience with nail art will influence your design choices. If you’re a beginner, go for simple designs like polka dots or stripes. If you’re more experienced, you can try intricate patterns like clover stamping or watercolor swirls. Choose a design that you feel confident executing to achieve the best results.
5. Decide on Nail Art Accessories
Consider whether you want to use nail art accessories, such as rhinestones, glitter, or stickers. These can add a fun touch to your designs but may require extra time and effort. If you love bling, look for designs that incorporate these elements, like themed nail art with rhinestones or glittery gold accents.
6. Factor in Time and Resources
Consider how much time you have to create your St Patrick’s Day nails. Some designs may take longer than others, especially if you plan to use multiple colors or intricate details. Ensure you have all the necessary nail polish and tools on hand before starting. If you’re short on time, opt for simpler designs that require fewer steps.
Pro Tip: If you’re unsure, start with one accent nail featuring a more intricate design and keep the others simple. This lets you show off your creativity while keeping the nail art manageable.
Choosing the right St Patrick’s Day nail designs is all about personal preference and celebration! Whether you embrace classic greens, festive golds, or intricate clovers, these tips will guide you in selecting the perfect look for your lucky day. Happy nail designing!
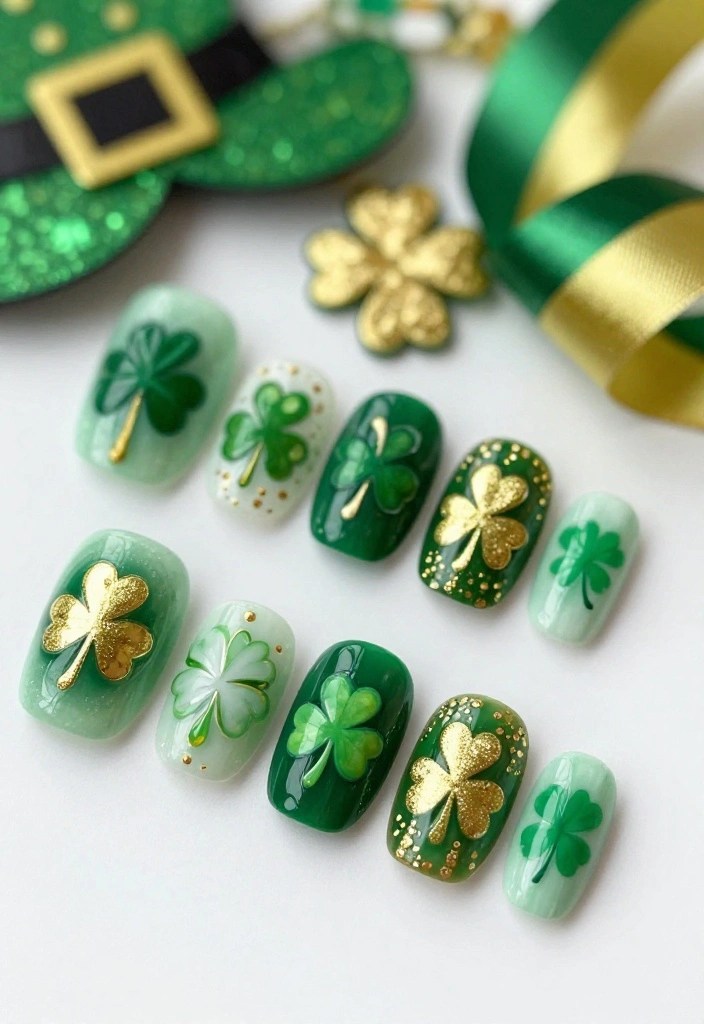
3. Cute Clover Nail Art
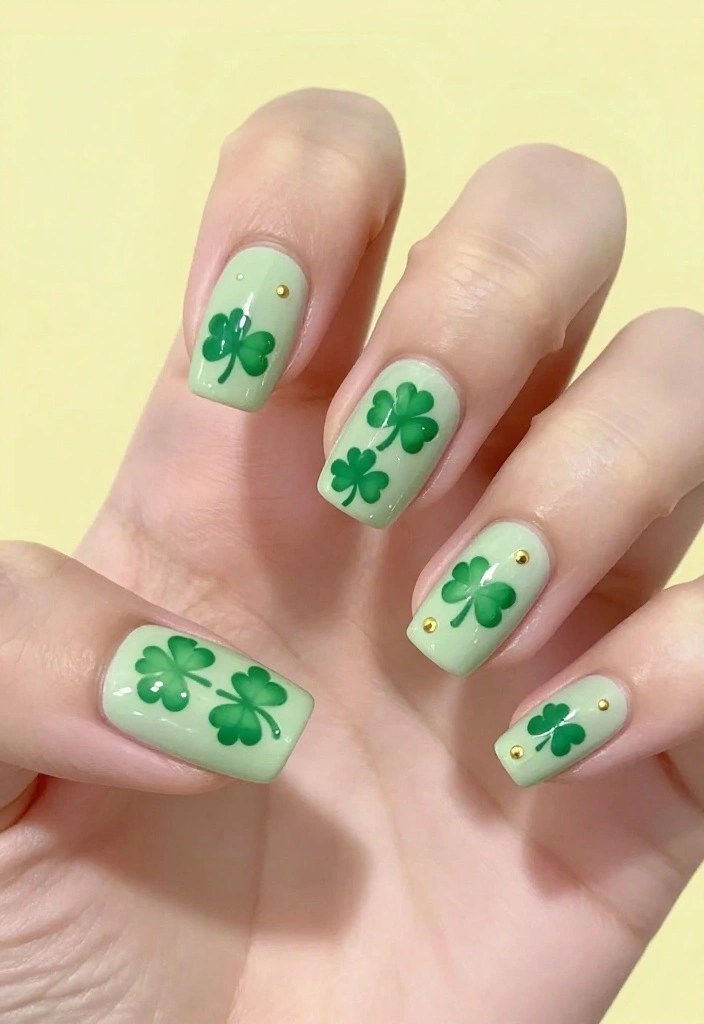
Celebrate St. Patrick’s Day with adorable clover nail art! This charming design features tiny clover shapes on a pastel green backdrop, making it a whimsical and festive choice for the holiday.
Start by painting your nails with a soft green base coat. After it dries, use a fine brush to create cute clover shapes in a darker green. For an extra touch, consider adding small dots of white or gold for decoration. This playful design is sure to spread good luck!
Tips for creating clovers:
– Use a dotting tool for precise shapes.
– Vary the sizes of clovers for a natural look.
– Finish with a top coat to protect your artwork.
Ingredients you’ll need:
– Soft green nail polish
– Dark green polish for the clovers
– Optional: Gold or white polish for dots
Step-by-step guide:
1. Apply a soft green base coat on all nails.
2. Use a fine brush to paint clover shapes on each nail.
3. Optionally, add decorative dots.
4. Seal with a top coat for durability.
This design radiates cuteness and festive spirit!
📹 Related Video: TUTORIAL: St Patricks Day / Clover Nail Art – water marbling
4. Rainbow and Pot of Gold

Bring some magic to your nails with a rainbow and pot of gold design! This vibrant look captures the spirit of St. Patrick’s Day and is sure to make you smile.
Start with a bright blue polish for the sky. Once dry, paint a colorful rainbow arching across your nails, and finish with a tiny black pot filled with golden dots representing coins. This cheerful design is a delightful conversation starter!
Tips for a vibrant rainbow:
– Use a thin brush for detailed painting.
– Allow each color to dry before adding the next.
– Seal your design with a top coat for lasting wear.
Ingredients to gather:
– Blue nail polish
– Red, yellow, green, blue, and purple polishes for the rainbow
– Black polish for the pot
– Gold polish for coins
Step-by-step instructions:
1. Apply blue polish as the base.
2. Once dry, paint a rainbow across your nails.
3. Add a pot at the end with gold dots.
4. Finish with a top coat for protection.
This design is full of personality and joy!
5. Gold Leaf Details
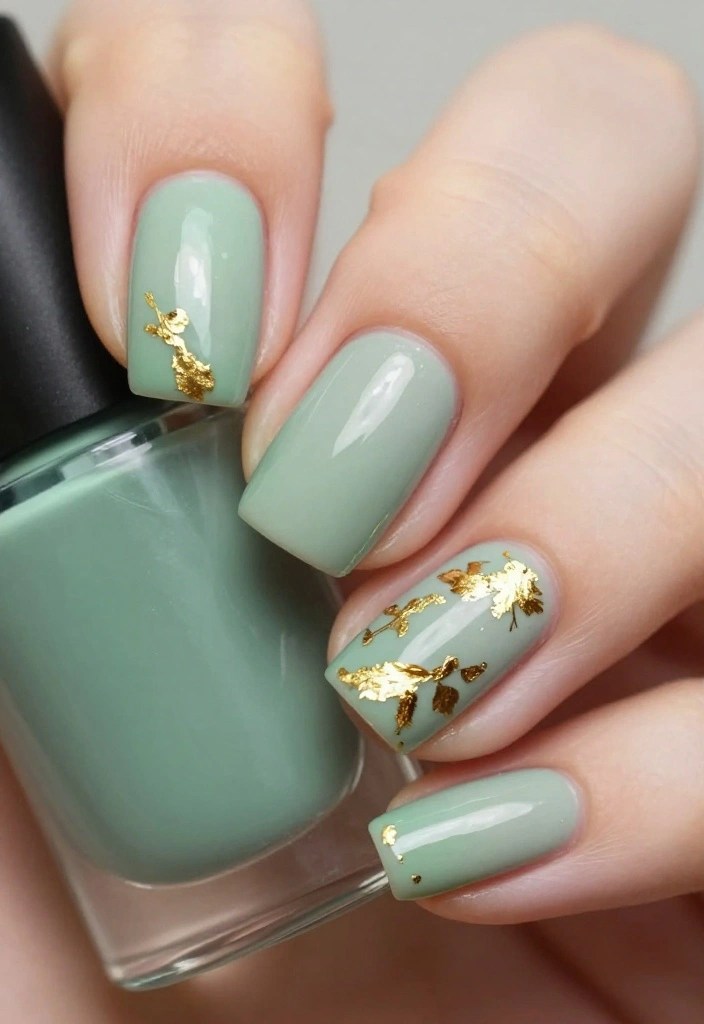
For a chic and sophisticated St. Patrick’s Day nail art look, try minimalistic designs with gold leaf details! This elegant style adds a touch of glamour while celebrating the holiday.
Start with a base coat of soft green or nude polish. After it dries, carefully apply pieces of gold leaf randomly across your nails for a stunning effect. Seal everything with a top coat to keep it looking fresh and beautiful.
Tips for applying gold leaf:
– Use tweezers for precise placement.
– Remember, less is more for a sleek design.
– Allow drying time between layers for best results.
Ingredients you’ll need:
– Soft green or nude nail polish
– Gold leaf
– Clear top coat
Step-by-step guide:
1. Start with your chosen base coat.
2. After drying, apply small pieces of gold leaf.
3. Finish with a clear top coat to seal.
This design is classy and adds a touch of sophistication to your nails!
Fun fact: A 1–2 mm gold leaf piece can instantly upgrade a simple nail design. Place 2–4 flakes randomly on a soft green or nude base, then seal with top coat for a chic, St Patrick’s Day glow.
6. St. Paddy’s Day Plaid
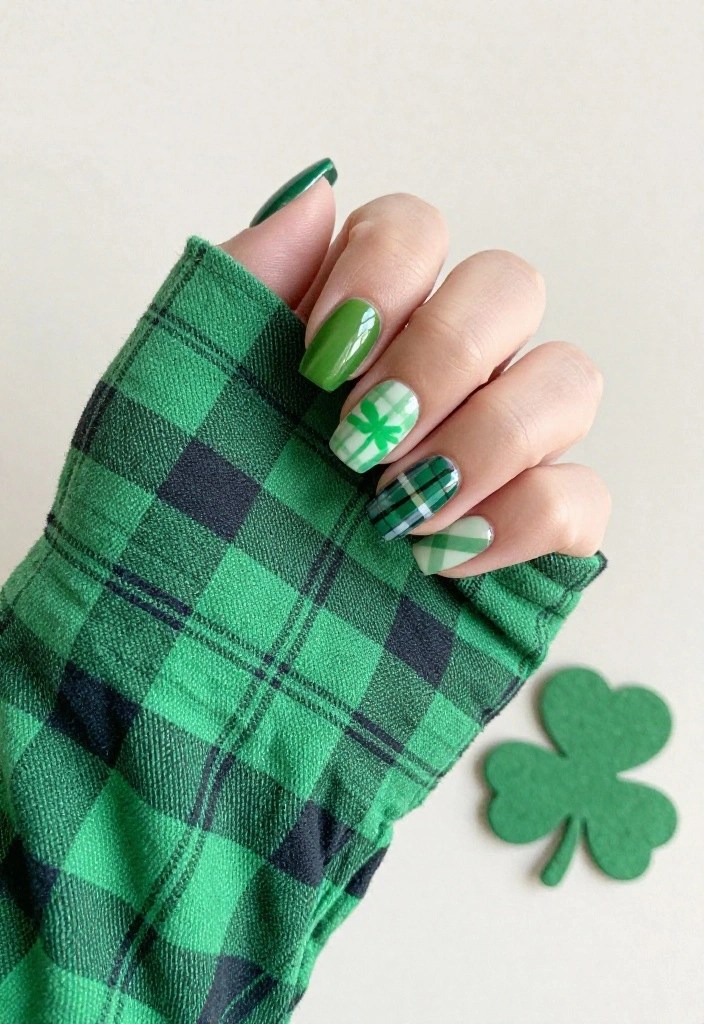
Plaid patterns bring cozy vibes to your St. Patrick’s Day nails! By combining different shades of green with white or gold, you can create a chic plaid look that celebrates the holiday.
Start by painting your nails in a solid green base. Once it’s dry, use a thin brush to create criss-cross patterns with a contrasting polish. Mix darker and lighter greens for added texture. This versatile design can be adorned with stickers or gems for extra charm!
Tips for creating plaid:
– Use striping tape for straight lines.
– Layer colors for depth and interest.
– Finish with a top coat for a polished look.
Ingredients to gather:
– Green nail polish in various shades
– White or gold polish for the lines
Step-by-step instructions:
1. Apply a solid base coat of your chosen green.
2. Once dry, create the plaid design with a fine brush.
3. Optionally, add gems or stickers for decoration.
4. Seal with a clear top coat.
This design combines tradition with a festive flair!
You might also like
14 Traditional Irish Recipes That Will Make Your Saint Patrick’s Day Magical!

15 Adorable St. Patrick’s Day Crafts for Kids That You Need to Try!
7. Shamrock Stamping
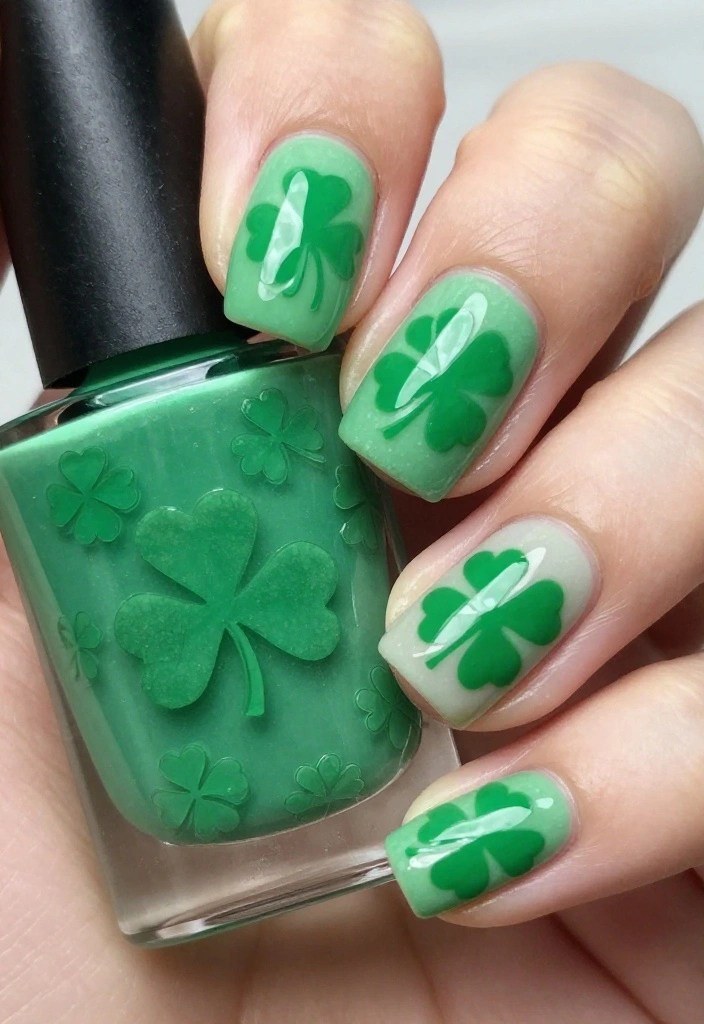
Looking for a quick and easy way to celebrate St. Patrick’s Day? Try shamrock stamping! This fun technique allows you to create intricate designs without spending hours on nail art.
Start with a solid green base coat. Once dry, use a stamping plate featuring clover designs. Apply your chosen color to the plate, scrape off the excess, and transfer the design onto your nails. It’s a simple way to achieve beautiful results!
Tips for stamping success:
– Ensure your base coat is completely dry to prevent smudging.
– Use a quality stamping polish for better results.
– Practice on paper before stamping on your nails.
Ingredients you’ll need:
– Green nail polish for base
– Stamping polish (white or gold)
– Stamping plate
Step-by-step guide:
1. Start with a green base coat.
2. Prepare your stamping plate with the clover design.
3. Stamp the design onto your nails.
4. Finish with a top coat.
This design is easy and perfect for last-minute nail art!
8. Watercolor Swirl
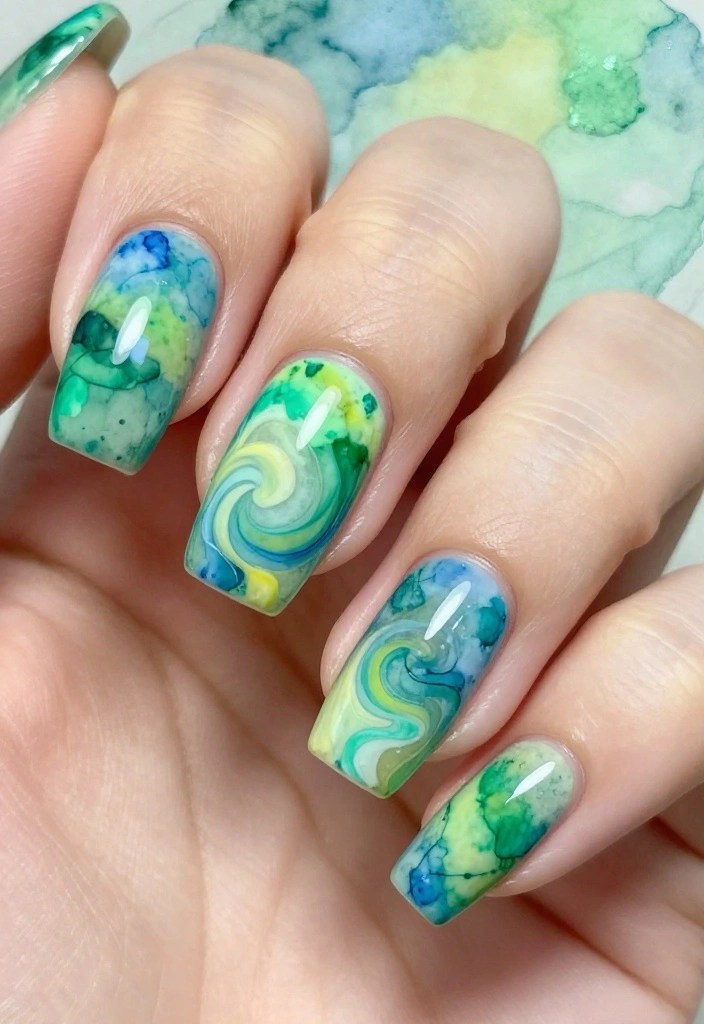
Get creative with a watercolor swirl design that combines vibrant greens, blues, and yellows for a dreamy effect. This artistic look is perfect for those who enjoy a unique take on St. Patrick’s Day.
Start with a white or light base coat. Using a small sponge, dab on various shades of green and other colors, blending them for a soft watercolor effect. Each nail can be different or match; the choice is yours!
Tips for watercolor nails:
– Use a cosmetic sponge for better blending.
– Work in layers to build color gradually.
– Seal with a top coat for a glossy finish.
Ingredients you’ll need:
– White or light base polish
– Various green and complementary polishes
Step-by-step instructions:
1. Apply a base coat of white or light color.
2. Using a sponge, dab various colors onto the nails.
3. Blend the colors smoothly for a watercolor effect.
4. Finish with a top coat.
This design is artistic and perfect for self-expression!
Watercolor Swirl nails are not only pretty, they’re practical. Start with a light base, dab on greens, blues, and yellows, and you’ll have unique St Patrick’s Day nail designs in minutes. Everyone will ask where you got them!
9. Simple Gold Dots
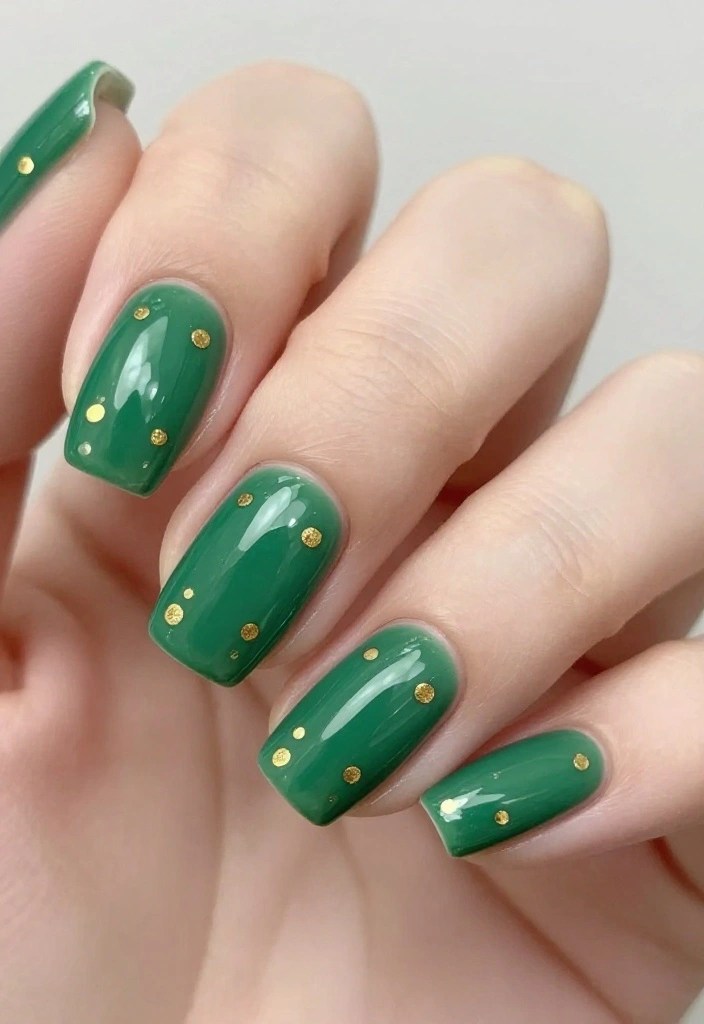
If you prefer a minimalistic approach, simple gold dots can give your nails a classy yet festive look for St. Patrick’s Day. This design is quick to create and adds the perfect touch of sparkle.
Start with a deep green or dark base coat. Once dry, use a dotting tool or toothpick to create small gold dots randomly across your nails. This chic look can be done in no time, great for those busy days!
Tips for dotting:
– Use a steady hand for even-sized dots.
– Experiment with different sizes for playful effects.
– Make sure the base is fully dry before dotting.
Ingredients you’ll need:
– Dark green or your chosen base polish
– Gold polish for dots
Step-by-step guide:
1. Apply a base coat of dark polish.
2. Once dry, use a dotting tool to create gold dots.
3. Finish with a top coat for shine.
This design is sleek and perfect for any occasion!
10. Lucky Charm Nail Art

Show off your festive spirit with lucky charm nail art! This playful design features tiny symbols of luck, like horseshoes and four-leaf clovers, perfect for St. Patrick’s Day.
Begin with a classic green base coat. Once dry, you can hand-paint the charms or use nail stickers for a quick application. This design lets you express your festive side while keeping your nails fun and lively!
Tips for charm designs:
– Use fine brushes for detailed painting.
– Stickers can save time while keeping it neat.
– Apply a top coat to protect your designs.
Ingredients you’ll need:
– Green nail polish for the base
– Colors for the charms (white, gold, etc.)
– Optional: nail stickers for charms
Step-by-step instructions:
1. Paint a solid green base coat.
2. Add charms by painting or using stickers.
3. Seal with a top coat for durability.
This design is cheerful and sure to bring a smile!
11. Negative Space Nail Art
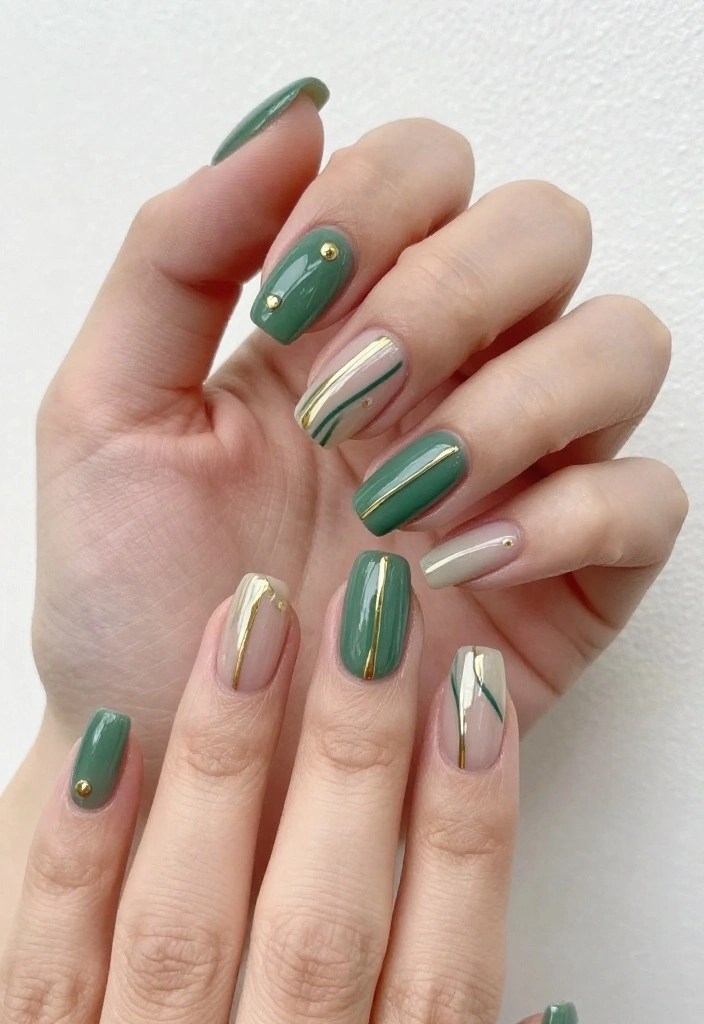
Negative space nail designs are trendy and perfect for celebrating St. Patrick’s Day! This style involves leaving parts of the nail unpainted while forming beautiful patterns.
Start with a clear or nude base coat. Use tape to create shapes or lines, then paint over them with green or gold polish. After removing the tape, the unpainted sections create a stunning contrast. This modern look is both chic and playful!
Tips for negative space designs:
– Ensure the base coat is fully dry before taping.
– Use sharp scissors to cut tape for clean lines.
– Seal with a top coat for the best finish.
Ingredients you’ll need:
– Clear or nude polish for the base
– Green and gold polishes
Step-by-step guide:
1. Start with a clear or nude base coat.
2. Tape your nails for the desired design.
3. Paint over with green or gold polish.
4. Remove the tape and seal with a top coat.
This design is trendy and gives a modern twist to your holiday nails!
You Might Also Like
12 Stunning Green Decor DIYs You Can Create for a Fresh and Vibrant Home!
12. Abstract Art with Gold Flakes

Unleash your creativity with an abstract art design that incorporates various colors and gold flakes! This artistic approach keeps the festive spirit alive while allowing for full personal expression.
Start with a white or light base coat. Use a fan brush to create swirls and strokes with shades of green, layering them with gold flakes for added texture. Each design can be as unique as you are, guaranteed to stand out!
Tips for abstract designs:
– Experiment with color placement for unique effects.
– Apply gold flakes lightly to avoid overwhelming the design.
– Seal with a top coat to keep everything intact.
Ingredients you’ll need:
– White or light base polish
– Various shades of green
– Gold flakes
Step-by-step instructions:
1. Start with a white or light base coat.
2. Create abstract shapes with green polish.
3. Add gold flakes while the polish is still wet.
4. Finish with a top coat.
This design is fun and perfect for showcasing your artistic flair!
13. Festive Skittle Nails
Skittle nails are all about vibrant colors! This design incorporates a different color on each nail while sticking to a green and gold palette to celebrate St. Patrick’s Day. It’s playful and fun, perfect for those who love to mix things up!
Choose a variety of greens, golds, and whites, painting each nail in a different shade. You can add small stickers or charms to enhance the festive theme. This design is perfect for showing off your colorful personality!
Tips for skittle nails:
– Select complementary colors for harmony.
– Mix textures with matte and glossy finishes.
– Add small festive decals to increase fun.
Ingredients to gather:
– Varied green and gold polishes
Step-by-step guide:
1. Choose your colors and apply a base coat.
2. Paint each nail a different color.
3. Optionally, add stickers or charms.
4. Seal with a top coat.
This design is vibrant and full of life!
14. Themed Nail Art with Rhinestones
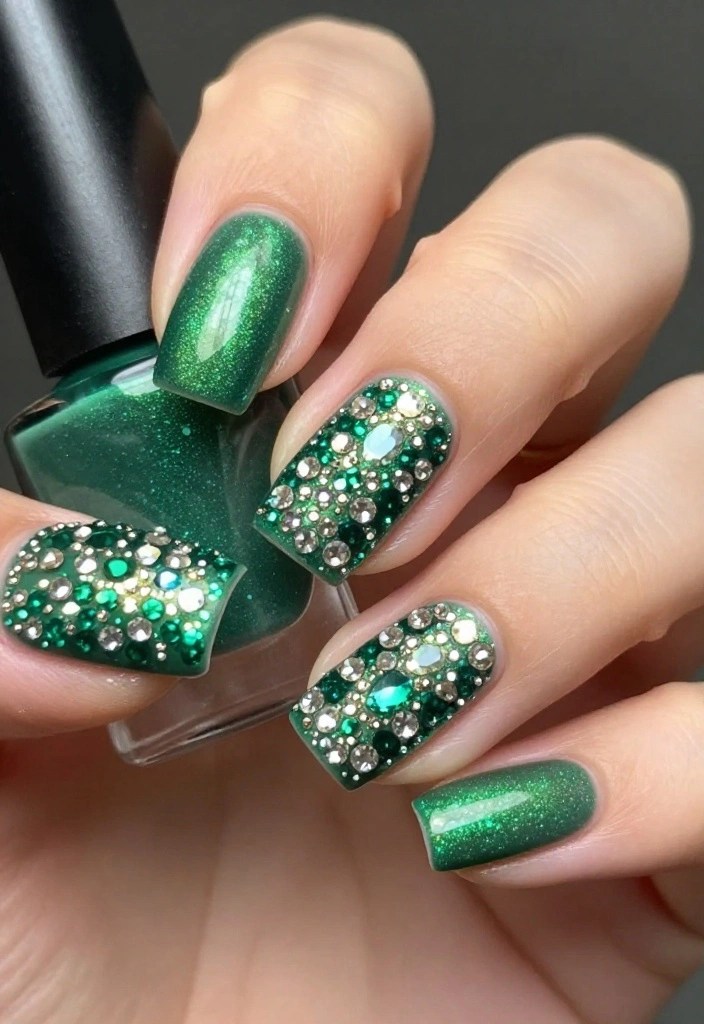
For those who love a bit of glamour, themed St. Patrick’s Day nail art with rhinestones is an excellent choice! The sparkle can elevate your nail design and make you feel extra special.
Start with a green base coat and apply rhinestones in various patterns, focusing on clovers and other lucky symbols. Use nail glue to secure the rhinestones and ensure they stay in place. This design is perfect for parties and special occasions!
Tips for rhinestone application:
– Use tweezers for precise placement.
– Apply a top coat to help secure the rhinestones.
– Choose flat-backed rhinestones for easier application.
Ingredients you’ll need:
– Green nail polish for the base
– Rhinestones in various sizes
Step-by-step instructions:
1. Apply a base coat of green polish.
2. Once dry, place rhinestones with tweezers in your desired design.
3. Seal with a top coat to secure.
This design is glamorous and an excellent way to make a statement!
We all want nails that sparkle through the night—St Patrick’s Day Nail Designs with rhinestones are your quick ticket to glam without extra fuss. Start with a green base coat and securely glue the stones for party-ready shine that lasts.
Conclusion
With these fabulous 14 St. Patrick’s Day nail designs, there’s no shortage of inspiration for your next manicure! Whether you opt for classic styles or daring designs, each look reflects the fun and festive spirit of the holiday. Embrace your creativity and enjoy experimenting with colors, textures, and themes. Your nails are a canvas for your imagination this St. Patrick’s Day!
Don’t forget to share your creations and join the celebration!
Frequently Asked Questions
What are the easiest St Patrick’s Day nail designs for beginners?
Getting a festive look doesn’t have to be complicated. For St Patrick’s Day Nail Designs, start with a solid emerald or deep green base using nail polish in your color of choice. Add a tiny shamrock using a stamping plate or nail stickers on one accent nail. Keep it chic with a thin gold line using striping tape.
Finish with a quick-dry or glossy top coat to protect your work. Simple steps: 1) prep nails and apply base coat, 2) apply 2 coats of green polish, 3) stamp or sticker a shamrock, 4) seal with top coat. Let each layer dry for best results.
Which nail polish colors work best for St Patrick’s Day nail designs?
For classic St Patrick’s Day vibes, build your palette around emerald green, olive, and gold tones. Try a shimmering gold accent on the tip or a white base with green accents.
Pair with seasonal nail art ideas like shamrocks, horseshoes, or rainbows. Use nail polish with good pigment payoff to avoid streaks, and finish with a durable top coat.
What easy techniques or tools can I use to add festive shamrocks without nail art skills?
Use affordable tools: stamping plates with shamrock designs, nail decals, or stickers can give you professional-looking St Patrick’s Day Nail Designs in minutes. If you want to DIY, use a fine brush or dotting tool to paint tiny shamrocks with nail polish. Metallic gold striping tape adds luck without effort. For a no-fuss look, apply a green base, place a shamrock decal on the ring finger, and seal with top coat. Practice on a plastic sheet first to get the sizing right.
What should I do to prep my nails for St Patrick’s Day nail designs to make them last?
Prep is everything. Gently push back cuticles, trim nails, and file to shape. Remove old polish, buff ridges, then apply a solid base coat to improve adhesion. Use a long-lasting nail polish formula or base coat, thin coats, allow drying time, and finish with a strong top coat. Avoid harsh soaking and acetone between layers to keep your manicure intact.
How can I extend the wear of St Patrick’s Day nail designs beyond the holiday?
Keep the luck going with a proactive care routine: layer thin coats of top coat every 2–3 days, seal the tips, and reapply after hand washing. Use a durable, chip-resistant nail polish and consider a gel top coat if you can. Avoid picking at edges, minimize exposure to harsh chemicals, and touch up any chips promptly to extend life into a seasonal nail art look.
Related Topics
St Patrick’s Day
nail art
seasonal nail designs
green nail polish
easy nail designs
festive nails
beginner friendly
glitter accents
Irish-themed nails
quick nail art
creative nail ideas
holiday nail trends

Leave a comment