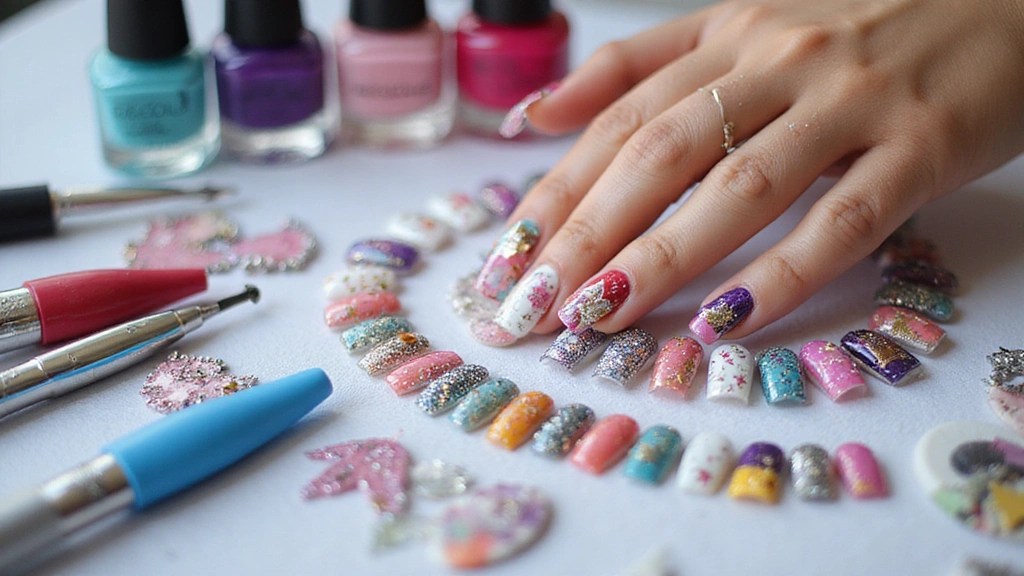
Star nails are where cosmic dreams meet trendy elegance, and they’re here to elevate your nail game!
From twinkling galaxies to simple star designs, you can easily create stunning looks right in the comfort of your home.
Whether you’re gearing up for a night out or just want to add a touch of whimsy to your everyday routine, these 15 DIY star nail designs will surely turn heads.
Let’s get ready to transform your nails into celestial masterpieces that are bound to leave your friends in awe!
Contents
- 1. Galaxy Glitter Stars
- 2. Minimalist Star Accent
- 3. Neon Starburst
- 4. Starry Night Sky
- 5. Color-Blocked Stars
- 6. Ombre Star Nails
- 7. Twinkling Foil Stars
- 8. Pastel Star Confetti
- 9. Artistic Watercolor Stars
- 10. Sparkly Star Halos
- 11. 3D Star Studs
- 12. Floral Star Combo
- 13. Checkerboard Stars
- 14. Textured Star Nails
- 15. Seasonal Star Designs
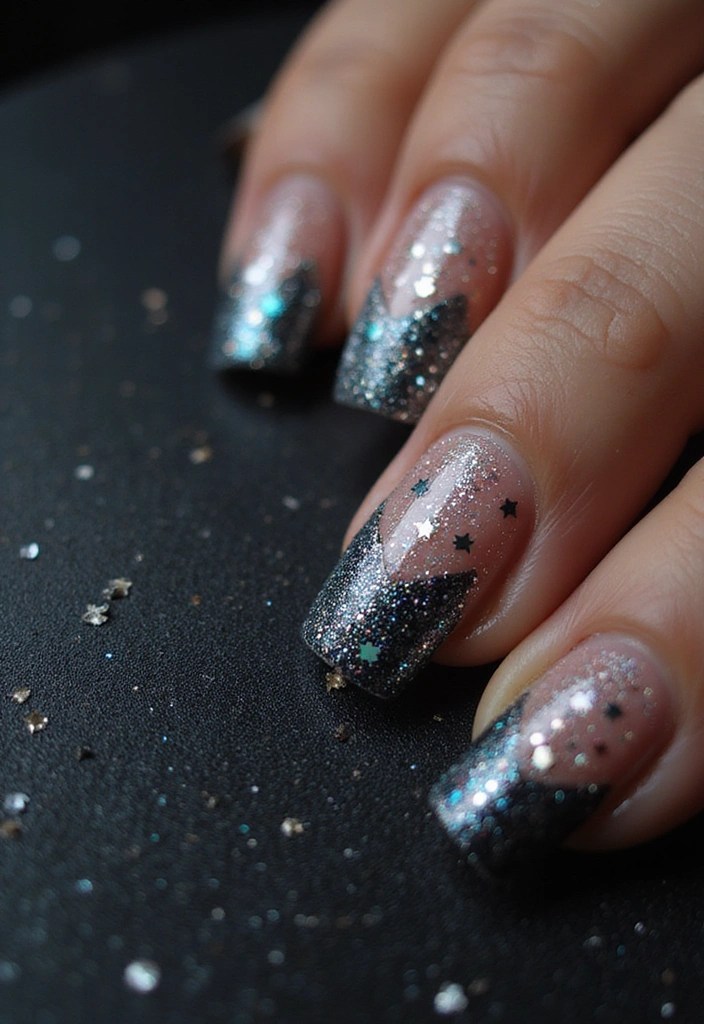
1. Galaxy Glitter Stars
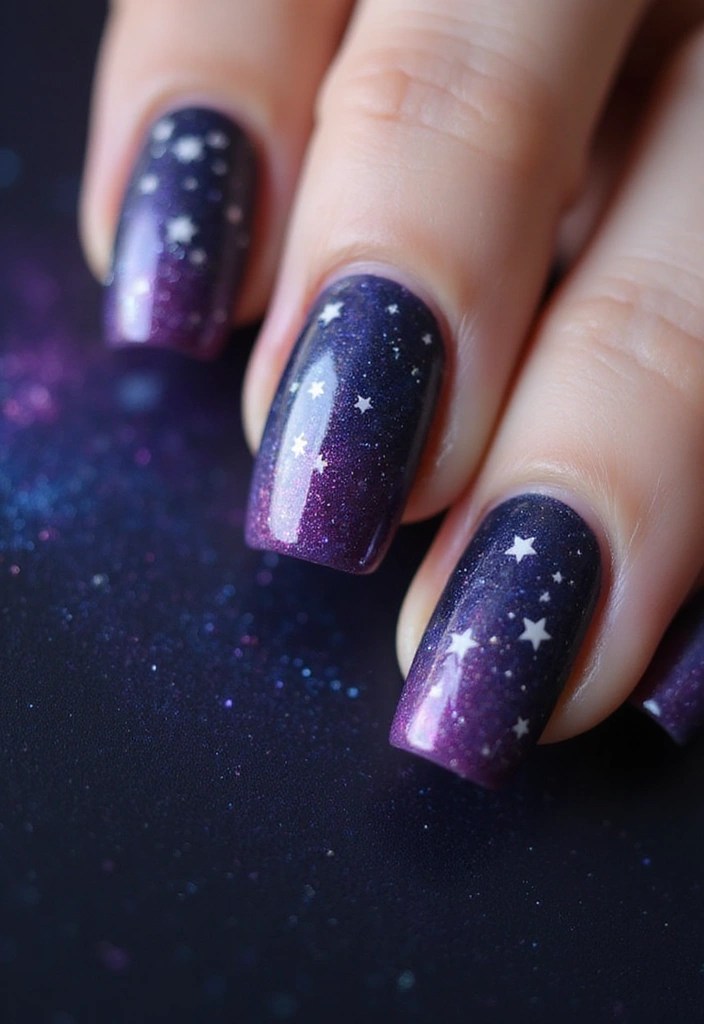
Create a mesmerizing galaxy effect with glittery stars that will make your nails sparkle like the night sky!
Start by painting your nails a deep navy or black base. Once dry, use a small sponge to dab on varying shades of purple, blue, and silver polish, simulating the cosmos. For the perfect blend of colors, you might want to grab a nail art dotting tools set, which can help you create those intricate designs with ease.
After allowing the gradient to set, take a fine brush or a dotting tool and add tiny glitter stars all around. A great option for achieving that sparkling effect is the glitter nail polish set, which features a variety of glittery shades that will enhance your nail art and give it that eye-catching shimmer.
Finish with a glossy topcoat using matte top coat nail polish to seal the look and ensure longevity. This design is perfect for those looking to add a bit of drama to their nail art!
– Use a matte base coat for a unique texture.
– Experiment with different glitter sizes for a 3D effect.
2. Minimalist Star Accent

If you love understated elegance, the minimalist star accent is perfect for you!
Begin with a fresh coat of nude or light pink nail polish for a clean base. Once it dries, select one or two nails to feature a small star design. Using a fine brush, like the fine detail nail art brush set, draw a tiny star in white or gold polish. This brush is perfect for achieving the precision needed for such delicate designs.
This subtle design works great for any occasion, giving your nails a chic flair without being too loud. For added sophistication, consider pairing it with a matte top coat nail polish, which will enhance the minimalist vibe and create a smooth, elegant finish.
– Keep your nails at a natural length to enhance the minimalist aesthetic.
– Choose contrasting colors for a more eye-catching look.
3. Neon Starburst
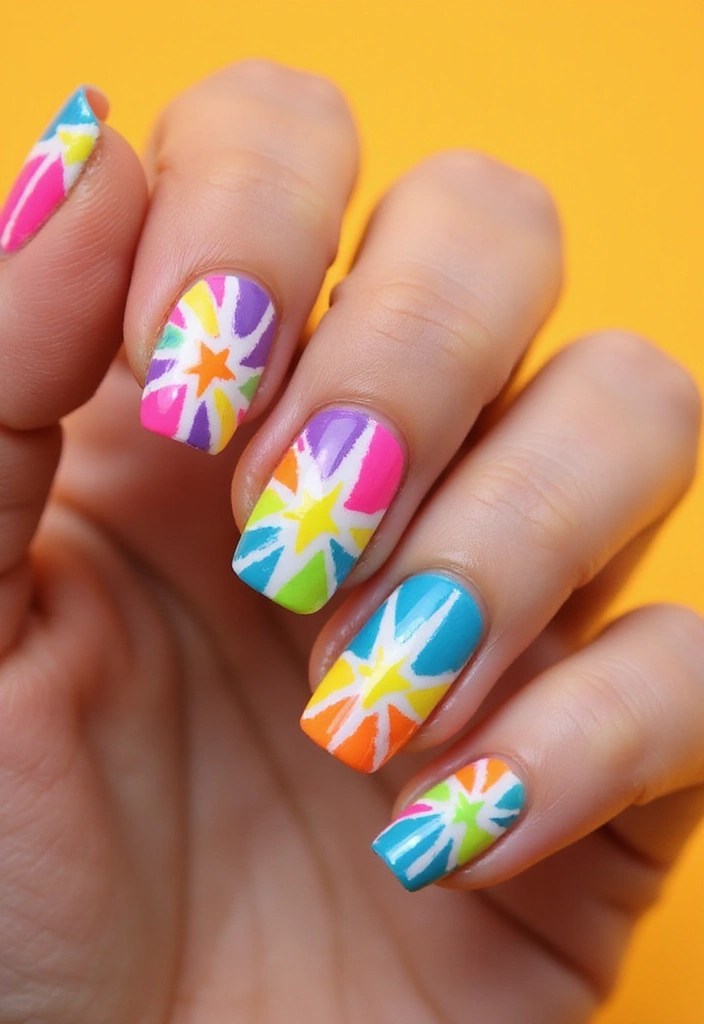
For those who adore vibrant colors, the neon starburst design is a must-try!
Pick your favorite neon shades from the Born Pretty Neon Nail Polish Set, featuring six bright colors perfect for achieving a fun, bright look. Use some nail art striping tape to create angular lines, mimicking rays bursting from a star.
Once the base is dry, apply a star sticker or use a tiny brush to paint stars in the center of the burst. This design screams summer fun and is perfect for sunny days out!
For a trendy twist, finish your nails with matte finishing spray for nails. Combine this eye-catching design with a flashy ring or bracelet for a complete look.
4. Starry Night Sky
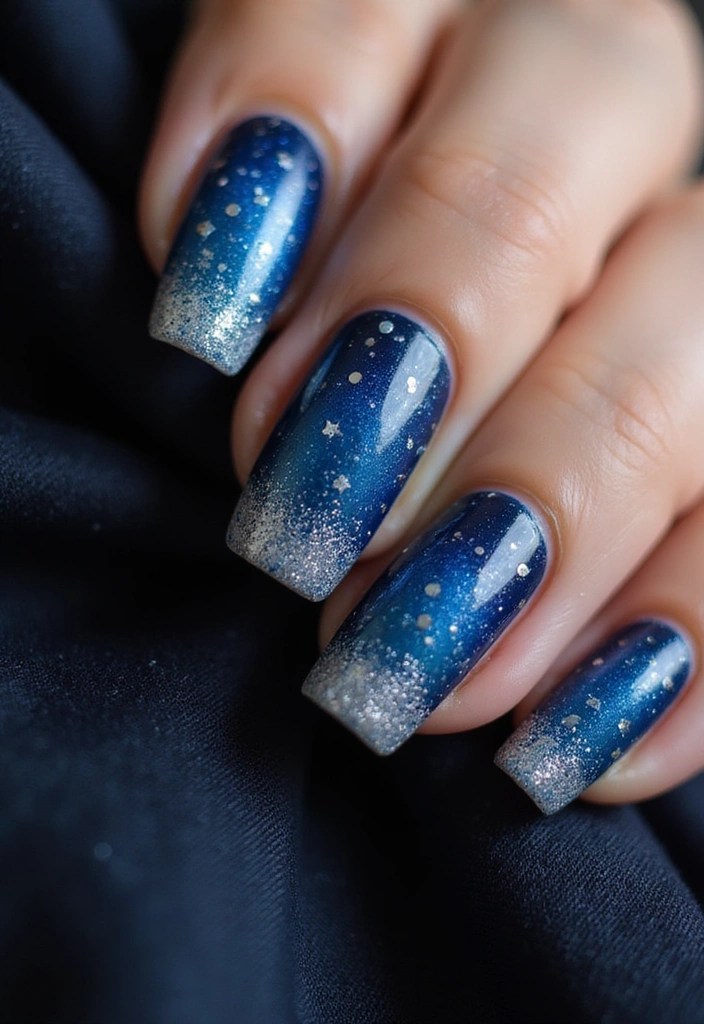
Transform your nails into a canvas for a starry night with this dreamy design!
Start by painting your nails a deep blue or black, ensuring they dry thoroughly. For creating whimsical star shapes in white or silver, you can use the Nail Art Brush Set, which includes a fine brush to help you achieve those delicate details. Don’t forget to add a few dots to represent planets!
To give your design that extra twinkle, consider swirling in some silver glitter with the Glitter Nail Polish. It’s an affordable way to add a sparkling effect that resembles a starry sky.
For a luxurious touch, you can add small rhinestones using the Nail Rhinestones. With 3200 pieces in various styles, you’ll have plenty to choose from to enhance your nail art.
This enchanting design will definitely make your nails a talking point, and trying different colors can create a unique night sky vibe!
5. Color-Blocked Stars
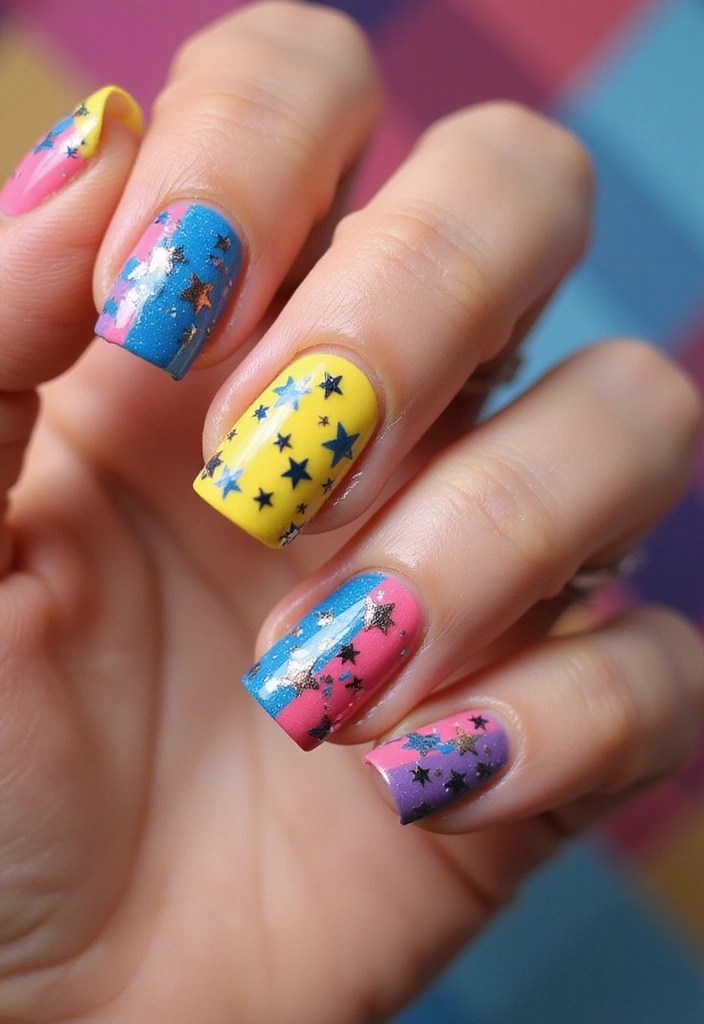
Mix and match colors for a fun and trendy color-blocked star design!
Pick two or three of your favorite colors and paint alternate nails in each shade. For vibrant options, consider using the 15 Bright Color 0.27oz Air Quick Dry Nail Polish Gift Set. Once dry, use a white or metallic polish to paint stars on top of the blocks. This design is playful and allows you to experiment with your favorite color combinations.
To achieve precise star shapes, the Artdone 31pcs Nail Art Brush Set is a great tool to have on hand. It includes various brushes that make it easier to create those stunning star designs without the fuss.
It’s perfect for those who love to mix it up!
– Consider using complementary colors for a striking contrast.
– Ensure each layer dries completely to avoid smudging!
If you prefer a quick solution, you can also enhance your nail art with nail art stickers for an added playful touch. These stickers can complement your color-blocked background beautifully and save you time on detailing.
6. Ombre Star Nails
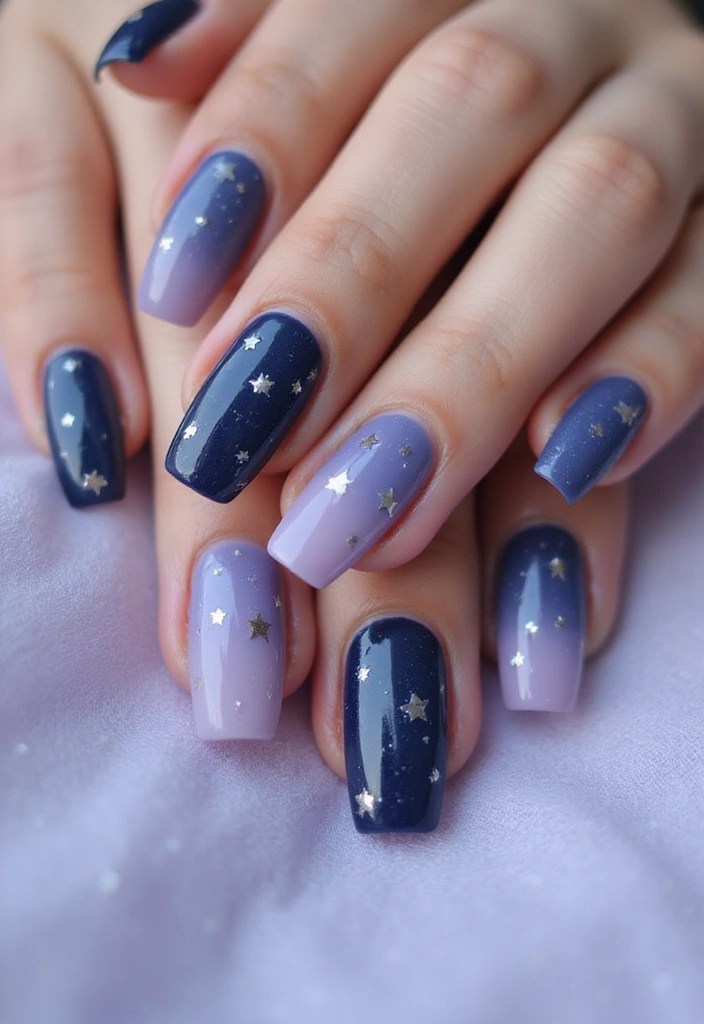
Bring the beauty of ombre into your star nails for a stunning effect!
Begin by creating an ombre effect on your nails using two shades, for instance, a dark blue fading into a soft lavender. For this step, you can use the Ombre Nail Polish Set, which offers a lovely variety of colors to help you achieve that perfect gradient. Once this is dry, use a dotting tool to add tiny stars throughout the gradient. The Dotting Tool Set for Nail Art is great for creating precision in placing the stars, resulting in an ethereal look with a delightful twinkle.
This design is perfect for those who love a mix of subtle and striking styles. To ensure your design lasts, seal it with a glossy finish using the Glossy Top Coat for Nails, which provides that extra shine and protection for your nail art.
– Practice the ombre technique on a piece of paper before applying it on your nails.
7. Twinkling Foil Stars
Add a touch of glam with twinkling foil stars!
Start with a base of dark polish, and once dry, use star-shaped foil pieces to create a stunning star design on your nails. The foil reflects light beautifully, giving you a luxurious appearance that’s bound to attract attention. For an easy application, you can use nail foil transfer sheets, which come in a variety of stunning designs, including starry patterns.
You can apply the foil randomly across your nails or create a precise star pattern. It’s festive, fun, and flair-filled! To ensure the foil sticks, use a clear adhesive like clear nail adhesive on the areas where you’ll apply the foil. This will provide a strong bond, making your design last longer.
Finish your starry manicure with a protective layer of top coat nail polish. This not only enhances the shine but also safeguards your beautiful design against chips and fading. With these products, you’ll create a look that’s sure to amaze your friends!
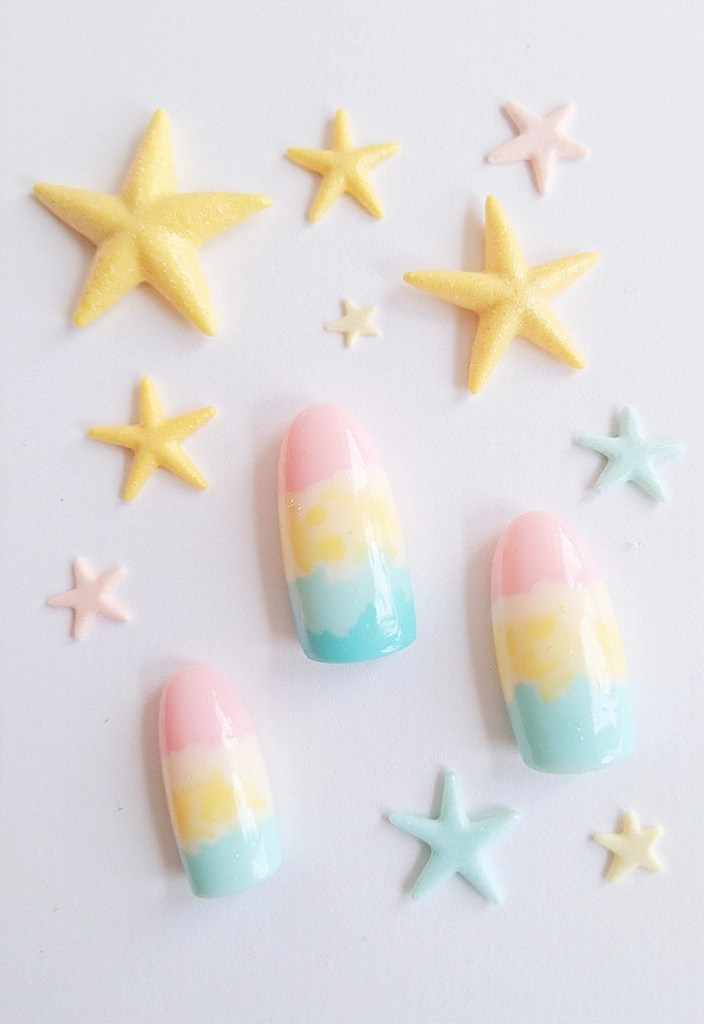
8. Pastel Star Confetti
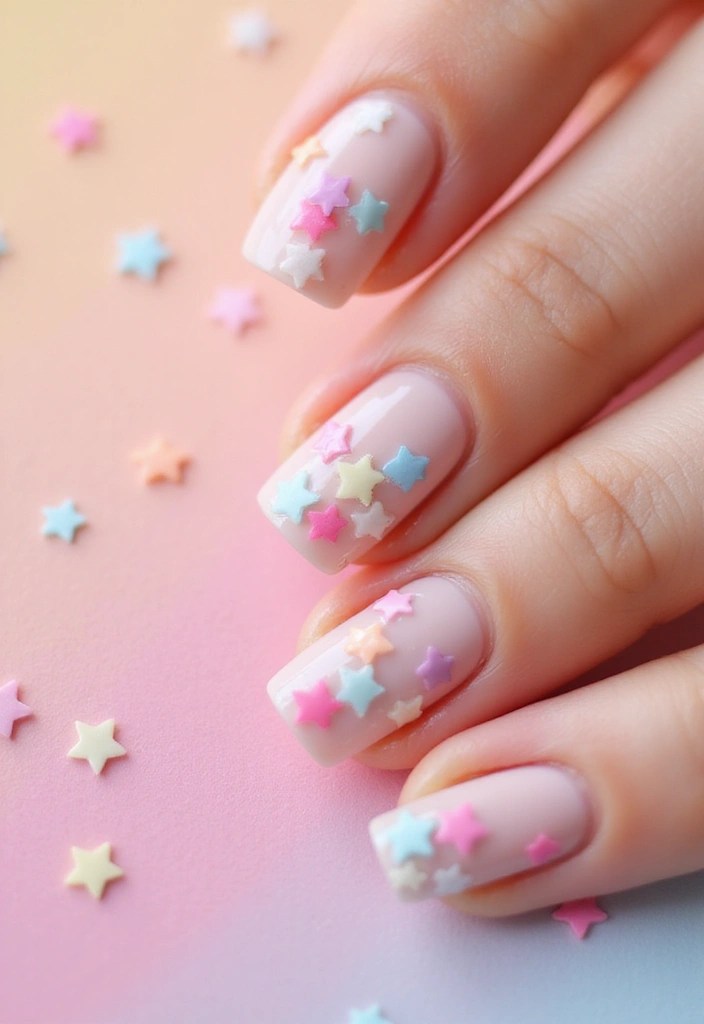
Bring a playful twist to your nails with pastel star confetti!
Start with a light base color, such as pale pink or mint green. Once your base is dry, sprinkle tiny pastel star confetti over your nails while the topcoat is still wet. Using pastel star confetti will allow the colors to pop beautifully and create an adorable, fun look that’s perfect for casual outings or summer parties.
To finish off your design, apply a matte topcoat like the GAOY matte gel top coat. This will give your nails a trendy matte finish and help seal in the confetti for long-lasting wear.
If you want to place larger pieces of confetti more precisely, consider using nail art tweezers. This tool makes it easy to handle the confetti and achieve a polished look. Enjoy your dazzling star nails that are sure to impress your friends!
9. Artistic Watercolor Stars
Unlock your inner artist with artistic watercolor stars!
Start by creating a base with a coat of white or light-colored polish—try the light-colored nail polish set, which offers a range of neutral shades perfect for your base. Once that dries, use a small brush to apply diluted nail polish or watercolors in swirling patterns to mimic a soft watercolor painting. The detail nail art brush set is ideal for this step, allowing you to experiment with various brush techniques to find your favorite style.
After the watercolor effect dries, add small star designs in contrasting colors to really make your nails pop. You can use the watercolor nail art set for vibrant metallic options that will bring your starry design to life. This artistic style allows for endless creativity and personalization, so don’t hesitate to blend colors lightly for that soft effect!
10. Sparkly Star Halos

Get ready to shine bright with sparkly star halos!
Start with a bold base coat like deep red or royal blue. After it dries, use a fine brush to outline small stars in gold glitter polish, creating a halo effect around each star. For the glitter polish, you can use the Glitter Nail Polish Set, which features a variety of colors including stunning gold glitter that will make your stars pop. This design is perfect for celebrations and will definitely make your nails the star of the show!
To achieve precise star outlines, you’ll want to grab a Fine Nail Art Brush Set. This set includes various brushes that will help you create intricate designs with ease, ensuring that your halos look flawless.
Additionally, remember to seal your design with a good top coat to keep the glitter from chipping. The Top Coat Nail Polish is a great option, as it offers a high-gloss finish and protects your nails while enhancing the vibrancy of your design.
– Choose glitter polishes with varying sizes to give depth.
– Seal with a top coat to keep the glitter from chipping.
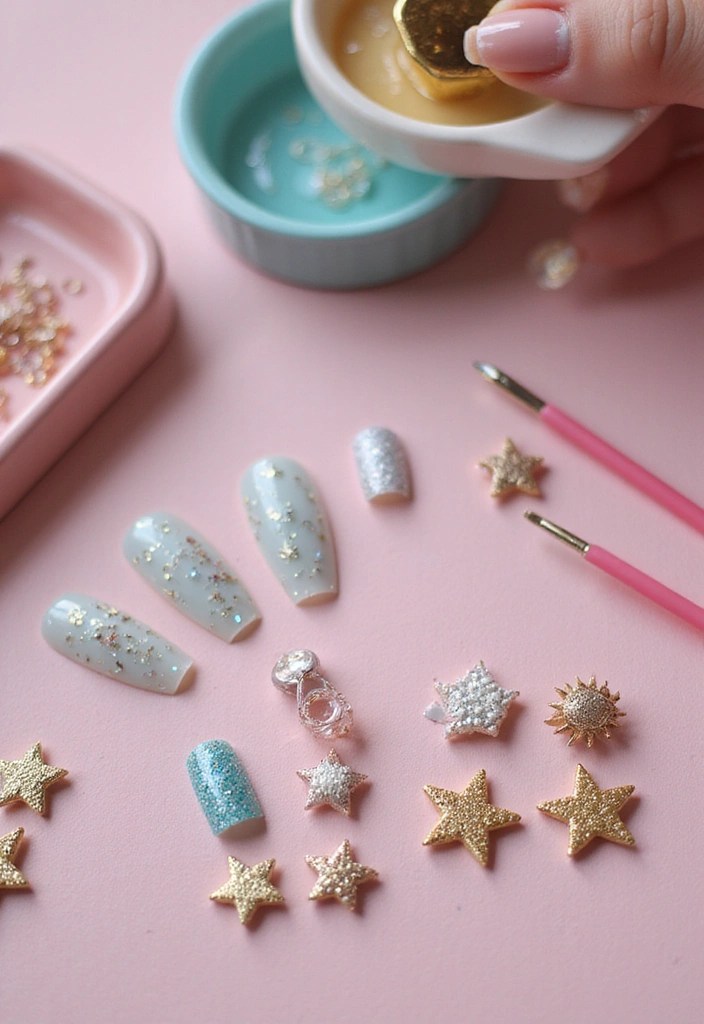
11. 3D Star Studs
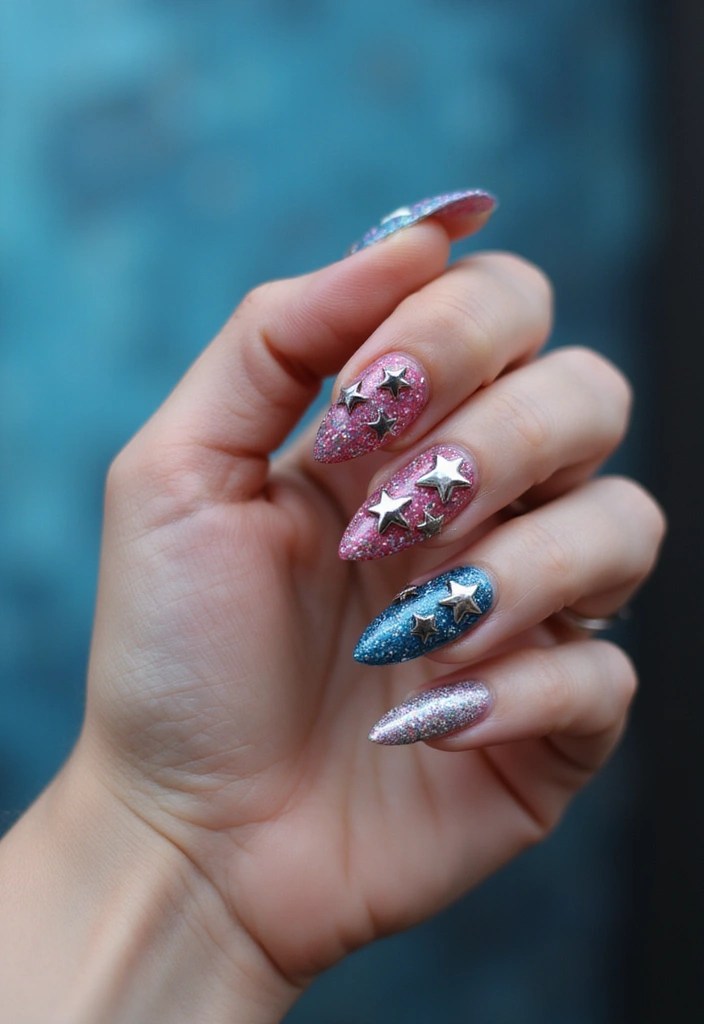
Elevate your star nails with the addition of 3D star studs for a fun and edgy look! Begin with your favorite polish and let it dry completely. For a secure hold, consider using KISS PowerFlex maximum speed nail glue. This fast-drying adhesive is perfect for gluing on your studs, ensuring they stay in place throughout your busy day.
Once your base polish is dry, apply a clear top coat like Sally Hansen double duty, base and top coat. This quick-drying formula will not only give your nails a streak-free shine but also help to lock in your 3D star studs while the polish is still wet.
Strategically place star-shaped studs from the 400Pcs star nail charms kit on your nails for a bold statement. You can even mix different sizes of studs for added interest and consider color coordinating them with your base polish for a cohesive look. This stylish approach is sure to impress your friends!
12. Floral Star Combo

Blend two trends together with floral and star designs for a romantic twist! Start with a pastel base color using a pastel nail polish set to achieve that soft look perfect for spring or summer occasions.
Next, use a small brush from the nail art brush set to paint tiny flowers on one or two nails. This set includes various brushes ideal for detailed work, making it easier to create those delicate floral patterns.
To complete your whimsical design, add delicate star accents around the flowers using tools from the same brush set or opt for the nail art stickers – stars and flowers to simplify the process. These self-adhesive decals provide an effortless way to incorporate stars without the hassle of painting. With this combination, your nails will truly stand out, and your friends will be amazed!
13. Checkerboard Stars
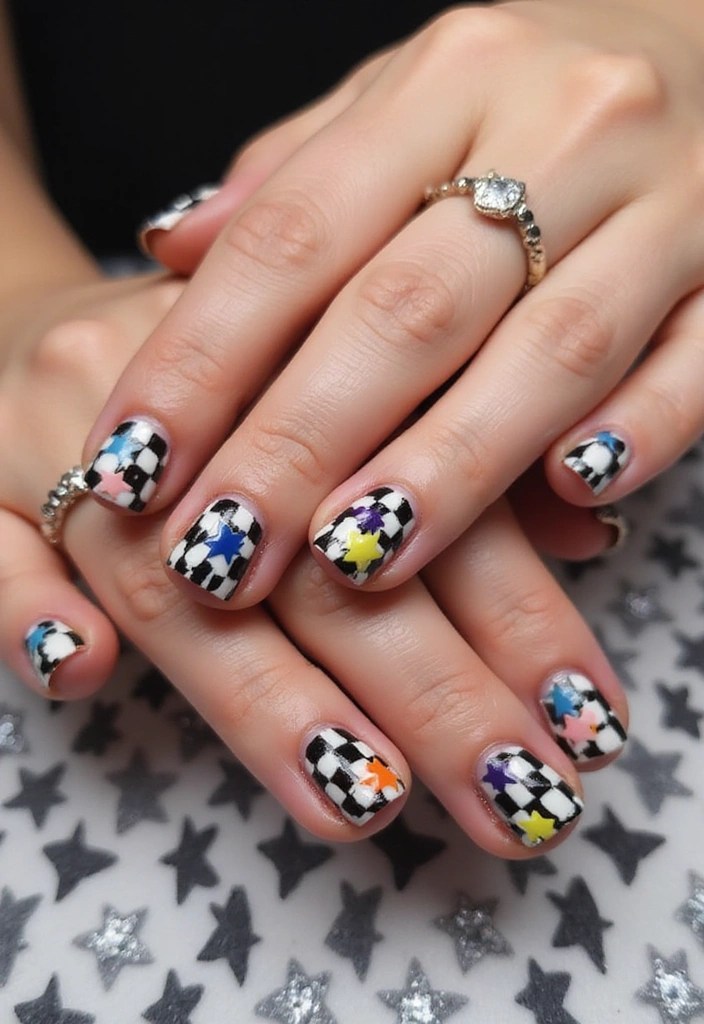
Get creative with a checkerboard star pattern that’s sure to impress!
Begin by painting your nails in alternating colors like black and white using a bold shade from the Nail Polish Set (Bold Colors). Once dry, create a small checkerboard effect using nail tape, such as the Nail Tape for Designs, for a clean and precise look. Add tiny stars inside the squares with a fine brush from the Nail Art Brush Set for a chic yet playful design. This style works great for both casual outings and trendy events!
– Keep your colors bold for a striking visual effect.
– Make sure all layers are completely dry before adding details.
14. Textured Star Nails

Introduce texture into your star nails for an eye-catching and tactile design!
Start with a base coat in a solid color, and then use a sponging technique to add a textured topcoat or glitter polish in certain areas. For this, consider using Insta-Dri®, Clear Top Coat, which provides quick drying and a streak-free shine, ensuring a flawless finish for your textured design. Once your base is dry, place small star-shaped decals or paint them on top for a layered effect. The 3D self-adhesive star nail art stickers are perfect for this, as they come in multiple colors and make it easy to achieve that fun, multidimensional appearance without the mess of painting stars yourself.
You can also experiment with different textures like matte or velvet to enhance your design. To apply the textured topcoat effectively, grab some nail art sponges to help you create a gradient or ombre effect. These sponges are designed for nail art and will ensure that you get a smooth application. Lastly, seal the design with a strong topcoat to maintain your beautiful star nails.
15. Seasonal Star Designs

Celebrate the seasons with themed star designs!
For spring, try pastel colors with floral stars using the pastel nail polish set that offers a lovely array of soft shades. In summer, brighten up your nails with sunburst styles, and the nail art brush set will help you create intricate designs easily. For fall, mix in warm tones with a rustic star pattern; the versatility of this kit allows for fluid strokes and detailed work. Lastly, for winter, opt for deep blues and silvers with snowflake stars; you can even use the nail stamping kit to effortlessly transfer beautiful patterns onto your nails.
This versatility allows you to keep your nails fresh and trendy throughout the year!
– Always match your seasonal designs with your outfits for a cohesive look.
– Don’t hesitate to mix seasonal elements for a unique twist.
Conclusion
With these 15 dazzling star nail designs, your DIY nail art game is about to reach new heights!
Whether you’re a beginner or a seasoned nail artist, there’s something here for everyone to try at home. Share your stunning creations with friends and show off your celestial skills!
Happy nail painting!
Note: We aim to provide accurate product links, but some may occasionally expire or become unavailable. If this happens, please search directly on Amazon for the product or a suitable alternative.
This post contains Amazon affiliate links, meaning I may earn a small commission if you purchase through my links, at no extra cost to you.

Leave a comment